TABLE OF CONTENTS:
1. FREQUENTLY ASKED QUESTIONS (GENERAL)
2.2 Video Tutorial: Using the Ministry Bookstore
2.3 Video Tutorial: Using the Forms/Publications Page
2.4 Video Tutorial: Using the Litigation Tools Page
2.5 Video Tutorial: Searching the Website
2.6 Video Tutorial: Using SEDM Adobe Acrobat Documents
2.7 Video Tutorial: Submitting files to SEDM that are too large to email as attachments
2.8 Video Tutorial: Using the Sovereignty Forms and Instructions Online, Form #10.004
2.9 Video Tutorial: Using the Member Subscriptions Area
3. MEMBER FORUMS AND BUDDYPRESS
3.2 Video Tutorial: Forum profile management and private messaging
3.3 Video Tutorial: Posting and editing content
4. PROBLEMS ACCESSING, VIEWING, OR READING FILES ON THIS WEBSITE
4.2 Acrobat File is Displayed but Display is Corrupted
4.3 Video Does Not Play
4.4 Text is too small within Acrobat application or Acrobat browser plug-in
4.5 Browser display is corrupted or missing things
5. PASSWORD AND LOGIN PROBLEMS
5.2 I am a Member Subscriber but I can't access the Member Subscriptions are. What am I doing wrong??
5.3 The forums or bookstore keep forgetting my Member or Member Subscription password and I have to keep typing them in every time I visit the site. How do I fix this?
6.2 Frequently Asked Questions About Our Response Letters
6.3 Video Tutorial: Setting Microsoft Word 2002 to 2003 Macro Security to Low
6.4 Setting Microsoft Word 2007 and later Macro Security to Enable Macros
6.5 Video Tutorial: Completing, Previewing, and Printing a Response Letter
7.2 Setting Up the MF Decoder Program
7.3 MF Decoder Video Demonstration
7.4 Video Tutorial: Entering data on the IMF Decoding Screen and Navigating Records
7.5 Setting up the Program Shortcut
7.6 Registering the Program
7.7 Video Tutorial: Producing Client Deliverables Needed for an IMF Decoding Rebuttal Letter
7.8 Program produces compile error when starting up
8.2 The disk does not autostart and display in my browser when I pop it into my drive.
8.3 I can't read the disk
9. LITIGATION AND LITIGATION TOOL SUPPORT
9.2 Video Tutorial: Using Microsoft Word Pleading Templates: MS Word 2007
9.3 Video Tutorial: Using the Sovereignty Forms and Instructions Online Area
10. PREVENTING SPAM BLOCKING OF SEDM EMAILS
10.2 Stopping Spam Blocking with Yahoo Mail: Classic Mode
11. FAMILY LEGAL ASSISTANT CASE MANAGEMENT SYSTEM
11.2 Setting up the Program Shortcut
11.3 FLA Video Demonstration
11.4 Managing Cases and Clients with FLA
1. FREQUENTLY ASKED QUESTIONS:
By far the most frequent of all question we get is from Members who are having trouble downloading or unzipping an electronic item they obtained from our ministry bookstore. These subjects are dealt with in detail in the sections below.
If you have further general questions about us, our religious ministry, about ordering, or donation issues, then please consult our Frequently Asked Questions (FAQs) at the link provided below.
- SEDM Frequently Asked Questions (FAQs)
- Questions and Answers from Ministry Members to Ministry Staff- SEDM Forums
- Guide to Asking Questions, Form #09.017-mandatory protocols you must follow for getting questions answered
1.1: Downloading and Reading Our eBooks
This article describes in detail the advantages of eBooks, how to use them, and compatibility with various eBook reader hardware and software.
Why Our Readers Prefer Electronic Books (downloading)
1.2: Unzipping Materials From Our Website
This article describes how to download and unzip materials you obtain from our website.
Using Decompression Utilities, Form #09.009 (unzipping)
2. USING THE WEBSITE
2.1: Video Tutorial: Registering, logging in, and logging out of the SEDM Website
This short video describes how to log in, log out, check the status of logging in, and accessing protected content while logged in.
Youtube
Registering, logging in, and logging out of SEDM Website (10 Minutes, 42 Mbytes, Microsoft Windows Media Player required)
2.2: Video Tutorial: Using the Ministry Bookstore
This video demonstrates how to use the SEDM Ministry Bookstore in order to order items or services from the ministry.
2.3: Video Tutorial: Using the Forms/Publications Page
This 45 minute video describes how to use the Forms/Publications Page of thise website. It is must viewing for those who want to optimally locate and use all the forms and publications available through this website.
2.4: Video Tutorial: Using the Litigation Tools Page
This 35 minute video whows how to use the Litigation Tools Page of this website. It is must viewing for all those who want to optimally locate and use all the litigation tools available through this website.
2.5: Video Tutorial: Searching the Website
This video describes how to efficiently and quickly locate content on our website using the many search tools that it has.
2.6: Video Tutorial: Using SEDM Adobe Acrobat Documents
The following link provides a video demonstration of the how to use, navigate, print, read, and fill-in SEDM forms and documents downloaded from this website. Please choose the version of Adobe Acrobat that you have
- Adobe Acrobat 9.x and earlier:
Youtube
Using SEDM Adobe Acrobat Documents (44 Minutes,
90 Mbytes; Microsoft
Media Player required)
- Adobe Acrobat 10.x and later:
Youtube
Using SEDM Adobe Acrobat Documents (36 Minutes,
78 Mbytes; Microsoft
Media Player required)
2.7: Video Tutorial: Submitting files to SEDM that are too large to email as attachments
This video tutorial demonstrates how to submit or send files to SEDM that are too large to email as attachments. Typically, there is a size limit on email attachments of approximately 3MB, depending on your Internet Service Provider. Using this procedure allows you to submit or send files of ANY size to SEDM for our review or processing. The most frequent application of this procedure is in the case of those who have obtained our MF Decoder software and who want to send us their copy of the software for either debugging or in order to allow us to prepare a decode rebuttal letter. Implementing the process does not require any special software and can be done with features built into your version of Windows. There is a simpler way to do this with a Graphical Tool, but you have to pay extra money for it and we didn't want to force you to spend money in order to send us files.
If you would rather use a simpler graphical software tool and spend the money to get it so you don't have to learn DOS or FTP, then the following tools are instead recommended:
- WS-FTP Professional (OFFSITE LINK)-full featured, but expensive.
- Cute FTP (OFFSITE LINK)- less expensive, and fewer features
2.8: Video Tutorial: Using the Sovereignty Forms and Instructions Online, Form #10.004
This video tutorial demonstrates how to use the Sovereignty Forms and Instructions Online, Form #10.004. The Sovereignty Forms and Instructions Online is a superset of the Sovereignty Forms and Instructions Manual, Form #10.005 which we provide through this website. The video is provided by a third party and we are not responsible for the content. Please DO NOT contact us with questions about the video or the web resource it describes. All such communications should be directed to the Family Guardian Forums (OFFSITE LINK) and NOT us. Enjoy!
2.9: Video Tutorial: Using Member Subscriptions Area
The following link provides a video demonstration of the how to use the Member Subscriptions area of the website.
3. MEMBER FORUMS AND BUDDYPRESS:
If your questions are not answered in either our Frequently Asked Questions Page in section 1 of this page or elsewhere on this page, then you can request individualized help by visiting our SEDM Support Forums at the link provided below. In order to join our forums, you must first Register by clicking on the Register link in the pink area at the top of the screen. The Registration process, in turn, requires you to consent unconditionally and comply fully with the terms of the SEDM Member Agreement, Form #01.001.
3.1: Video Tutorial: Forum security, visibility, and privacy
The following link provides a video demonstration describing security, visibility, and privacy within the Member Forums.
3.2: Video Tutorial: Forum profile management and private messaging
The following link provides a video demonstration of how to use member profiles and private messaging.
3.3: Video Tutorial: Posting and editing content
The following link provides a video demonstration of how to post and edit Member Forum content.
4. PROBLEMS ACCESSING, VIEWING, OR READING FILES ON THIS WEBSITE
This section addresses problems accessing, viewing, or reading files on our website. The various file types found on this website include the following:
| Symbol | Format |
| Adobe Acrobat format. Requires the free Adobe Reader available from: http://get.adobe.com/reader/ | |
| ZIP format. This is a compressed format which requires a decompression utility. Click here for instructions on where to find decompression utilities and how to use them. | |
| Microsoft Word format. These files are editable word processing files which require Microsoft Word 2000 or later to edit. Please watch Item 9.1 on our Support Page in order to learn how to use this type of a document. | |
| HTML | Browser format. Requires a web browser to view. |
| Windows Media Audio/Video File. Requires Windows Media Player, which comes standard with Windows XP, Vista, and Windows 7. If you have a Mac, you can download a free WMV player from Microsoft by clicking here. | |
| Adobe Flash Player. Download at: http://get.adobe.com/flashplayer/ | |
| Audio file. Includes MP3, *.wav files. |
▲ Go to beginning
4.1: Can't Read Acrobat File from Within Browser
Most of the files on this website are posted in Adobe Acrobat format. You will know this because there will be an Acrobat symbol to the left of the file name as follows:
If you click on one of these links and the file does not display, it is because you do not have the free Adobe Acrobat Reader installed on your computer. Please click on the link below, download the latest Acrobat Reader, and install it as per the instructions and this should fix your problem.
http://get.adobe.com/reader/
WARNING!: There are several third party companies that make Adobe Acrobat file reader software that integrates with your browser. Below this paragraph is a list of vendors that we know about. Every such implementation that we have seen is flawed, incomplete, defective, or unreliable. In addition, such software may experience conflicts if you also install the free Adobe Reader on the same system. We therefore strongly advise disabling or uninstalling browser PDF viewing features of all these products:
- Fox-It PDF Reader (OFFSITE LINK)-works in Firefox browser only. Not Internet Explorer
4.2: Acrobat File is Displayed But Display is Corrupted
If you can display Acrobat files from our website but the presentation is corrupted, then one of the following problems are likely, in the order they occur:
-
PROBLEM 1: You have an older version of Adobe Acrobat reader installed that doesn't display newer file formats correctly or completely.
RESOLUTION 1: Download and install the latest version of the free Adobe Acrobat Reader software off the Adobe Website at http://get.adobe.com/reader/ -
PROBLEM 2: You are not using the free Adobe Reader and instead have a third party Acrobat viewing or editing installed on your system that does not completely implement all of the PDF specification capabilities or is buggy.
RESOLUTION 2: Download and install the latest version of the free Adobe Acrobat Reader software off the Adobe Website at http://get.adobe.com/reader/
WARNING!: There are several third party companies that make Adobe Acrobat file reader software that integrates with your browser. Below this paragraph is a list of vendors that we know about. Every such implementation that we have seen is flawed, incomplete, defective, or unreliable. In addition, such software may experience conflicts if you also install the free Adobe Reader on the same system. We therefore strongly advise disabling or uninstalling browser PDF viewing features of all these products:
- Fox-It PDF Reader (OFFSITE LINK)-works in Firefox browser only. Not Internet Explorer
4.3: Video Does Not Play
Our website uses two video formats:
-
Windows Media Viewer (WMV).
-
MPG.
We do not use Apple Quicktime (*.MOV) format or flash viewer. The only thing that you need in order to display any of the videos on our website is the free Microsoft Windows Media Player, which you can download at the link below and which comes as a standard part of Microsoft Windows:
Apple Macintosh computers do NOT come by default with the ability to play Windows Media Viewer files. If you need that ability because you own a Mac, we highly recommend the following FREE program. This program is also very useful on a pc for playing other non-standard video formats:
VLC Media Player
4.4: Text is too small within Acrobat application or Acrobat browser plug in
Adobe Acrobat has a very useful feature for putting a document in Full Screen mode to maximize the viewing area and make the document much more readable. To use this feature, simply click on the document viewing area from within the Acrobat application and hit the "Ctrl" and "L" keys simultaneously on your keyboard. Most people are surprised to learn about this very useful feature when they hear about it.
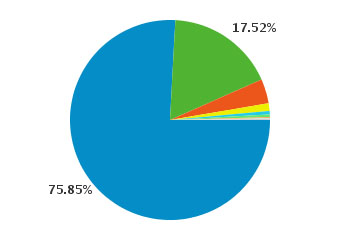
4.5: Browser Display is corrupted or missing things
Below is a pie chart showing the frequency of the different types of browsers our visitors use:
 |
|
We test our website with the following browsers to ensure compatibility.
- Microsoft Internet Explorer 7.0, 8.0, and 9.0.
- Firefox 3.5, and 4.0.
- Apple Safari 4.0, 5.0.
- Google Chrome 10.0.
We don't test our website with earlier versions of the above programs. If you are using any of the above programs, we recommend upgrading to the latest version to minimize compatibility problems. All of them are a free download.
Of the above browsers, the ones that work best and exhibit the fewest display rendering problems are Microsoft Internet Explorer 8.0 and Firefox 3.5. If your computer will support either of these two browsers, we highly recommend installing one of them to minimize problems.
Following is a list of known compatibility issues with the above browsers. Browsers not listed have exhibited no known compatibility issues:
- Internet Explorer 8: Sometimes (infrequently), the spacing between lines is removed on long pages. This is an intermittent problem and it goes away if you refresh the screen by hitting the F5 key.
- Apple Safari (all versions): Problems completing bookstore checkout. In particular, after you make a donation, sometimes the passback to our site does not work and the transaction doesn't complete properly. Please use Firefox or IE instead when accessing our Bookstore.
5. PASSWORD AND LOGIN PROBLEMS
5.1: I forgot my Password
If you forgot yourpassword:
- Go do the Participate->Login screen.
- Click on “I’ve forgotten my password!” under the “Password” field.
- Enter either your account username or email address.
- The forum software will email your password to your last known email address.
5.2: I am a Member Subscriber but I can't access the Member Subscriber area. What am I doing wrong?
You didn't follow the procedures prescribed step 5 of Section 3 of the Member Subscriptions page. After you signed up for Member Subscriptions through our Member Bookstore, you were supposed to submit your Member Forum username and order number to our Contact Us page so that we could upgrade your forum permissions. Please submit your forum username and your Member Subscription order number via our Contact Us page so we can upgrade your account and notify you via email that we have done it. You can find the order number in your order confirmation email that you received when you signed up for Member Subscriptions. We aren't mind readers and your forum username is usually different from your bookstore username, so there is no way for us to determine in advance what your forum user account name is. Things will work fine when you read and follow directions for joining joining our Member Subscriptions.
5.3: The forums or bookstore keep forgetting my Member or Member Subscription password and I have to keep typing them in every time I visit the site. How do I fix this?
The feature that isn't working is called "browser password caching". At some point, you told your browser not to remember the password for our specific site. The way to disable this feature so that it remembers the password again depends on the browser you are using.
1. If you are using Internet Explorer see:
http://www.ehow.com/how_8210508_disable-remember-password-ie-8.html
http://support.microsoft.com/kb/229940
2. If you are using Mozilla Firefox, see:
http://www.ehow.com/how_8343232_disable-remember-passwords-firefox.html
3. If you are using Google Chrome, see:
http://www.electrictoolbox.com/remove-saved-password-google-chrome/
6. TAX RESPONSE LETTER HELP:
An index of all of our federal and state response letters and instructions for their proper use may be found at the two links below:
6.1: List of Common Response Letter Problems with their Recommended Resolution
The following list provides a summary of the most common problems with response letters and details on how to fix them::
| # | Description | Resolution |
| 1 | The Response Letter asks me for a password | Set Microsoft Word Macro Security to "Low" as indicated in section 3.3 or section 3.4 below. This requirement is also covered in the "Response Letter Instructions" on the first page of the response letter, in steps 1 or 2. Please read and follow the Response Letter Instructions. |
| 2 | The "Print" or "Preview" buttons do not work | Set Microsoft Word Macro Security to "Low" as indicated in section 3.3 or section 3.4 below. This requirement is also covered in the "Response Letter Instructions" on the first page of the response letter, in steps 1 or 2. Please read and follow the Response Letter Instructions. |
| 3 | I cannot select and copy text using the clipboard | The response letters are copy protected to prevent this. We cannot make exceptions to the copyright for any reason. This is covered in "Frequently Asked Questions About Our Response Letters, Question #17" |
| 4 | The letter has errors and I cannot edit the letter | The response letters are copy protected to prevent this. We cannot make exceptions to the copyright for any reason. If you need to correct an error, please contact us via email and we will promptly fix the problem and email you a corrected letter. This is covered in "Frequently Asked Questions About Our Response Letters, Question #17" |
| 5 | I get the following error when I press the print button: "RUNTIME ERROR 5941, THE REQUESTED MEMBER OF THE COLLECTION DOES NOT EXIST" | If you set Macro security to low as indicated on the letter and you get this error, most likely your anti-virus software is interfering with running macros. You need to disable your anti-virus software and try again. If that doesn't help, try it on a different computer. |
| 6 | The letter won't open in my word processor or the Print or Preview buttons don't show up on it. | You are probably using the WRONG word processor. The response letters ONLY work with Microsoft Word. They do NOT work with Microsoft "Works" or WordPerfect. Please obtain the correct word processor. If you are unsure which word processor you are using, open the word processor and look in the Help -> About menu to see. Chances are, it says "Microsoft Works". Click here for details and read questions 32 and 34. |
6.2: Frequently Asked Questions About Our Response Letters
For a list of frequently asked questions relating to tax response letters, click on the link below:
6.3 Video Tutorial: Setting Microsoft Word 2002 to 2003 Macro Security to Low
The first thing you MUST do BEFORE you enter data into the response letter worksheet is to set Microsoft Word Macro Security Level to Low and exit the program. This is covered in the first step on the cover page of each response letter. If you don't do this, then you will get the following error: When you try to enter data or push any of the buttons on the letter, then you will be asked for a password to the letter. This problem only occurs on Microsoft Word 2002 and later. It does not occur with Microsoft Word 2000 because this version of Word does not implement macro security..
IMPORTANT NOTE: If you cannot find the "Macro Security" entry on the menus within your word processor and you think you are using Microsoft Word, then chances are that one of the following two conditions exist:
|
Below is a video demonstration of how this process works to make the process perfectly clear.
6.4 Setting Microsoft Word 2007 and Later Macro Security to Enable Macros
The user interface was completely updated beginning with Microsoft Word 2007. The menu bars were eliminated and replaced with the ribbon bar. The following instructions provide graphical instructions on how to set Microsoft Word 2007 and later Macro Security to enable macros. If you don't follow these instructions, the "Print" and "Preview" buttons on your tax response letter will not work properly.
Click here to read the instructions
6.5 Video Tutorial: Completing, Previewing, and Printing a Response Letter
After you have followed the tutorial in steps 3.3 or 3.4 above, next you must:
- Populate the response letter worksheet
- Hit the "Preview" button
- Click the Print" button to print the letter.
If you don't follow the above steps, then the data from the worksheet will not populate the letter and the letter will print without any of your personal information on it. The video tutorial below shows exactly how this is done using the IRS Letter CP14 response.
7. MASTER FILE DECODER:
This section describes how to resolve problems
encountered installing and using our Master File (MF)
Decoder software. Most of the questions we get relate to how to
install the program. Installation of the program is described in sections
2.2 through 2.2.9 of the free ![]() Master File (MF)
Decoder User Manual, Form #09.018. If you are installing or using
this software, regardless of what version of the program you are using,
we recommend using the latest version of the MF Decoder Manual, which you
can always obtain using the link below:
Master File (MF)
Decoder User Manual, Form #09.018. If you are installing or using
this software, regardless of what version of the program you are using,
we recommend using the latest version of the MF Decoder Manual, which you
can always obtain using the link below:
7.1: List of Common MF Decoder Problems with their Recommended Resolution
The following list provides a summary of the most common problems with response letters and details on how to fix them::
| # | Description | Resolution |
| 1 | MF Decoder produces an error when I try to print. |
|
| 2 | I cannot read the Acrobat books on the CD | You are using an older version of the free Adobe Acrobat reader. Please download and install the latest version at: |
| 3 | The IMF Decode Rebuttal Letter does not fill in my information from the worksheet to the letter or the "Print" or "Preview" buttons do not work. | You need to set Microsoft Word Macro Security to "Low" as indicated in step 3.3 above. |
| 4 | When I enter transactions on the IMF Decoding Screen, the database doesn't populate the Subfields automatically | You aren't starting the database from the Shortcut created in
section 2.2.4 of the |
| 5 | The database won't properly import my old data using the Import Button | This is covered in section 2.2.7 of the |
| 6 | The IMF Decoding Screen is displaying transaction data that I didn't enter. | You aren't entering data properly. Please view the video tutorial below in section 4.3. |
| 7 | The address for my local IRS Disclosure Office does not appear in the database | The IRS disclosure office addresses change every few years and
there is no way to directly update the database to correct
this problem. However, two work-arounds are provided:
|
| 8 | FOIA Request S11 doesn't have a place to fill in the IRS agent names before the report is printed. | You need to add this to the FOIA yourself manually using Microsoft Word. When you go to print the FOIA request in the Print Report Dialog, select the "RTF File" option, then enter the filename you want to save the report as, including the full path to the report, such as "C:\Temp\FOIAS11.rtf". After the FOIA prints as an RTF at the path you specify, open it up with Microsoft Word and add the specific agent names. Alternatively, you can write them in after the FOIA request prints. |
7.2 Setting Up the MF Decoder Program
The following links provide tools to help you setup the MF Decoder software, both the Pro and the Standard editions, and how to access the CD or ZIP file that comes with either.
MF Decoder Quick Start Guide-Short printed quick start guide that helps you setup the MF Decoder software
7.3 MF Decoder Video Demonstration
The following link provides a video demonstration of the main features of the Master File (MF) Decoder Program. This is the same video file as the one that is shipped on the Master File Professional CD.
7.4 Video Tutorial: Entering Data on the IMF Decoding Screen and Navigating Records
The most complicated aspect of how to use the MF Decoder is entering data on the IMF Decoding Screen. This short video tutorial shows you exactly how to enter data on the IMF Decoding Screen..
7.5 Setting up the Program Shortcut
The ![]() MF Decoder User
Manual, Form #09.018, section 2.2.4, describes how to set up the MF Decoder Program Shortcut that you can click on to startup the program from your desktop
or Windows Start Bar. Some people have trouble creating this shortcut
using the instructions, causing the program to not run properly when
you start up the program. This section will show you how to create
this shortcut simply and easily in order to correct the problems you
are having:
MF Decoder User
Manual, Form #09.018, section 2.2.4, describes how to set up the MF Decoder Program Shortcut that you can click on to startup the program from your desktop
or Windows Start Bar. Some people have trouble creating this shortcut
using the instructions, causing the program to not run properly when
you start up the program. This section will show you how to create
this shortcut simply and easily in order to correct the problems you
are having:
-
Using pre-made shortcut on the MF Decoder Pro CD: Starting with MF Decoder version 1.90 and later, the MF Decoder Pro CD comes with a shortcut on the CD that is ready to go. To use this pre-made shortcut:
1.1 Put the MF Decoder Pro CD in your CD drive.
1.2 Open your Windows Explorer by right clicking on the START button and selecting "Explore".
1.3 Using the Windows Explorer, navigate to the following directory:
\MFDecoder\
1.4 In the above directory, find the following file:
"MFDecoder Shortcut"
1.5 Click on the shortcut file and then drag it to your desktop or your start bar.
1.6 From either your desktop or your start bar, click on the shortcut you created above and the program will start properly.
-
Using the free shortcut available on this website: If you obtained the MF Decoder Standard so that you don't have the MF Decoder Pro CD, you can follow the procedures in step one above and instead use the following shortcut off our website. Simply right-click on the link, select "Save As", and then save it to your local hard drive.
2.1 If you are using the Standard version of MF Decoder, using the following shortcuts.
Microsoft Access 2002: MFDecoderStdShortcut2002.lnk
Microsoft Access 2003: MFDecoderStdShortcut2003.lnk
Microsoft Access 2007: MFDecoderStdShortcut2007.lnk
Microsoft Access 2010: MFDecoderStdShortcut2010.lnk
Microsoft Access 2013: MFDecoderStdShortcut2013.lnk
All of the above shortcuts are contained in the following downloadable zip file: MFDecoderStdShortcuts.zip
2.2 If you are using the Professional version of MF Decoder, using the following shortcuts.
Microsoft Access 2002: MFDecoderProShortcut2002.lnk
Microsoft Access 2003: MFDecoderProShortcut2003.lnk
Microsoft Access 2007: MFDecoderProShortcut2007.lnk
Microsoft Access 2010: MFDecoderProShortcut2010.lnk
Microsoft Access 2013: MFDecoderProShortcut2013.lnk
All of the above shortcuts are contained in the following downloadable zip file: MFDecoderProShortcuts.zip
-
Building the shortcut yourself: If you want to make your own shortcut, you can follow section 2.2.4 of the MF Decoder Manual to create the shortcut, and simply paste the text below into the "Target" window of the Shortcut Properties window shown in the manual:
3.1 If you are using the Standard version of MF Decoder, select the following text with your mouse and right click on the selection and select "Copy" to put it into your clipboard. Then go to the Shortcut "Target window" and hit "Ctrl-V" to paste the text into the field.
Microsoft Access 2002:
"C:\Program Files\Microsoft Office\OFFICE10\MSACCESS.EXE" C:\Database\MFDecoder\MFDecoder-Std2003.mdb /wrkgrp C:\Database\MFDecoder\Secured.mdw /User decoder
Microsoft Access 2003:
"C:\Program Files\Microsoft Office\OFFICE11\MSACCESS.EXE" C:\Database\MFDecoder\MFDecoder-Std2003.mdb /wrkgrp C:\Database\MFDecoder\Secured.mdw /User decoder
Microsoft Access 2007:
"C:\Program Files\Microsoft Office\OFFICE12\MSACCESS.EXE" C:\Database\MFDecoder\MFDecoder-Std2003.mdb /wrkgrp C:\Database\MFDecoder\Secured.mdw /User decoder
Microsoft Access 2010:
"C:\Program Files\Microsoft Office\OFFICE14\MSACCESS.EXE" C:\Database\MFDecoder\MFDecoder-Std2003.mdb /wrkgrp C:\Database\MFDecoder\Secured.mdw /User decoder
Microsoft Access 2013:
"C:\Program Files\Microsoft Office 15\root\OFFICE15\MSACCESS.EXE" C:\Database\MFDecoder\MFDecoder-Std2003.mdb /wrkgrp C:\Database\MFDecoder\Secured.mdw /User decoder
3.2 If you are using the Professional version of MF Decoder, select the following text with your mouse and right click on the selection and select "Copy" to put it into your clipboard. Then go to the Shortcut "Target window" and hit "Ctrl-V" to paste the text into the field.
Microsoft Access 2002:
"C:\Program Files\Microsoft Office\OFFICE10\MSACCESS.EXE" C:\Database\MFDecoder\MFDecoder-Pro2003.mdb /wrkgrp C:\Database\MFDecoder\Secured.mdw /User decoder
Microsoft Access 2003:
"C:\Program Files\Microsoft Office\OFFICE11\MSACCESS.EXE" C:\Database\MFDecoder\MFDecoder-Pro2003.mdb /wrkgrp C:\Database\MFDecoder\Secured.mdw /User decoder
Microsoft Access 2007:
"C:\Program Files\Microsoft Office\OFFICE12\MSACCESS.EXE" C:\Database\MFDecoder\MFDecoder-Pro2003.mdb /wrkgrp C:\Database\MFDecoder\Secured.mdw /User decoder
Microsoft Access 2010:
"C:\Program Files\Microsoft Office\OFFICE14\MSACCESS.EXE" C:\Database\MFDecoder\MFDecoder-Pro2003.mdb /wrkgrp C:\Database\MFDecoder\Secured.mdw /User decoder
Microsoft Access 2013:
"C:\Program Files\Microsoft Office 15\root\OFFICE15\MSACCESS.EXE" C:\Database\MFDecoder\MFDecoder-Pro2003.mdb /wrkgrp C:\Database\MFDecoder\Secured.mdw /User decoder
7.6 Registering the program
Starting with version 1.96, program registration was added as a copy protection vehicle to prevent illegal copying and pirating of the program. If you try to run the program on a machine without registering it, the program will not work. This section directs you to the instructions to register the program.
Registration is easy and you only have to register the program once
for each physcial computer you will run the program on. The ![]() MF Decoder User
Manual, Form #09.018, sections 2.9 through 2.9.2 contain the instructions
for registering the program. Follow the instructions for program
registration in that section and send us the information requested through
our Contact Us page and we will promptly email you the program registration code.
MF Decoder User
Manual, Form #09.018, sections 2.9 through 2.9.2 contain the instructions
for registering the program. Follow the instructions for program
registration in that section and send us the information requested through
our Contact Us page and we will promptly email you the program registration code.
7.7 Video Tutorial: Producing Client Deliverables Needed for an IMF Decode Rebuttal Letter
This short video is for use by those who own the Master File Decoder, who have requested and decoded their own IMF records, and who want to engage us to produce only the IMF Decode Rebuttal Letter based on the data contained in their Master File Decoder. The output of this process is the following PDF reports:
-
Illegals Summary Report: Single report covering ALL tax years and showing specific illegal transactions pertaining to the client.
-
IMF Decoding Report: One report for EACH tax year you intend to be covered by the rebuttal letter. There are usually multiple versions of this report.
Below is the video describing how to produce the deliverables:
7.8 Program produces compile error when starting up
When you set up the program in accordance with chapter 2 of the MF Decoder User Manual, some users have reported the following error:
" Compile error in hidden module: form_mfdecoder"
This problem is caused by incompatibilities with the version of MS Office you have installed and it occurs when:
-
You have Office versions 2002, or 2010 installed.
-
You did not install Microsoft Outlook with your version of MS Office.
To fix this problem, right click on the following link and copy the downloaded file to the following directory on your local hard drive:
MSOUTL.OLB
Place the file in the following directory. If the directory doesn't exist, then create it:
Microsoft Access 2002:
C:\Program Files\Microsoft Office\OFFICE10\MSOUTL.OLB
Microsoft Access 2003:
C:\Program Files\Microsoft Office\OFFICE11\MSOUTL.OLB
Microsoft Access 2007:
C:\Program Files\Microsoft Office\OFFICE12\MSOUTL.OLB
Microsoft Access 2010:
C:\Program Files\Microsoft Office\OFFICE14\MSOUTL.OLB
8. DATA DISKS (CDs and DVDs):
TThe following common problems relate to data disks available from this website, such as the Family Guardian Website DVD, the MF Decoder, the "What Happened to Justice" CD, the Tax Deposition CD, etc.
8.1: Video Tutorial: Burning CDs and DVDs from ZIP files downloaded from our website
Those who obtains CDs and DVDs through our bookstore have an option to select electronic delivery and to then burn their own CD or DVD from the item downloaded. This video tutorial demonstrates how to complete the download of the item, how to unzip or decompress the data, and how to burn the data onto a CD or DVD. A important notes on successfully perfoming this process:
- Performing this process requires more than just basic computer skill.
- The process works best if you have a high speed internet connection so that your download won't take more than a few minutes. The procedure is much less convenient for those with slow dial-up lines.
- You will need two specialized software applications installed
on your computer to complete the process:
3.1 Disk burning software. This demonstration uses Nero Burning ROM software, which is the most commonly used application of its time. Click here to visit the manufacturer website and learn about this product.
3.2 ZIP decompression software. This demonstration uses PKWare PKZip.
3.2.1 Click here to visit the manufacturer website and learn about this product.
3.2.2 Click here for an article on using decompression utilities generally. -
You will need a CD or DVD drive that has the capability to burn disks installed in your computer.
8.2: The Disk does not autostart and display in my browser when I pop it into my drive
All of our data disks are designed so that they will autostart when you insert them into the drive, open up Internet Explorer, and display the opening page. If your disk does not do this or does nothing when you put it into the drive, it is probably because:
- You are running a MAC. Autostart doesn't work on a MAC.
- You have disabled the autostart feature of Microsoft Windows.
- You are using an Operating System (OS) Firewall such as Zone Alarm Pro, which intercepts the execution of programs on your disks and can disable them. Set the OS firewall so that it doesn' t prevent running executables on the disks.
- The disk is a DVD instead of a CD and your disk drive only reads CDs and not DVDs. In this case, please update your disk drive or try to read the disk with a different computer.
- The disk is defective. Try it in another machine to see if it works there.
To work around all of the above problems, simply open Windows Explorer and double-click on the file named "index.htm". That will open your Internet Explorer web browser to the opening screen of the disk so that you can browse the remainder of the disk.
8.3: I can't read the disk
Very rarely do we see this problem. Usually, it is caused by any one of the following::
- The disk is a DVD instead of a CD and your disk drive only reads CDs and not DVDs. In this case, please update your disk drive or try to read the disk with a different computer.
- Your disk drive is an older drive and does not read the format we sent you, such as the latest DVD-R or CD-R format. In that case, upgrade the drive and try again or read it in another computer.
- Your disk drive is dirty and needs to be cleaning because the dirt is causing read errors. In that case, clean the drive using a drive cleaning kit.
- The disk is defective and needs to be replaced. In this case, contact us via our Contact Us page with all of the particulars of your order and your problem, and we may send you a replacement disk.
9. LITIGATION AND LITIGATION TOOL SUPPORT
TThis section provides demonstrations how to use pleadings and tools available through our Litigation Tools Page.
9.1: Video Tutorial: Using Microsoft Word Pleading Templates: MS Word 2003
All of the legal pleading templates available through our Litigation Tools Page are provided in Microsoft Word format. This section provides a video demonstration that shows you how to use these legal pleading templates with Microsoft Word 2003. We show you how to:
- Initialize the template with your personal information.
- Navigate the document using the Document Map view.
- Apply styles to the document.
- Add text to the document under a section heading.
- Use the outlining mode to reorganize your document and navigate it.
- Automate the generation of the table of contents and table of authorities at the beginning of the document.
This is a very important skill you can use in many contexts and will save you TONS of time preparing your own legal documents. Below is the video demonstration:
9.2: Video Tutorial: Using Microsoft Word Pleading Templates: MS Word 2007
All of the legal pleading templates available through our Litigation Tools Page are provided in Microsoft Word format. This section provides a video demonstration that shows you how to use these legal pleading templates with Microsoft Word 2007. We show you how to:
- Initialize the template with your personal information.
- Navigate the document using the Document Map view.
- Apply styles to the document.
- Add text to the document under a section heading.
- Use the outlining mode to reorganize your document and navigate it.
- Automate the generation of the table of contents and table of authorities at the beginning of the document.
This is a very important skill you can use in many contexts and will save you TONS of time preparing your own legal documents. Below is the video demonstration:
9.3: Video Tutorial: Using the Sovereignty Forms and Instructions Online Area
Our Opening Page and our Litigation Tools Page both have legal research links at the top, many of which come from the Sovereignty Forms and Instructions Online, Form #10.004 (OFFSITE LINK) on our sister website. Knowing how to use this resource is very important in legal document preparation, and especially the Cites by Topic (OFFSITE LINK). Watch this tutorial off their website to become familiar with how to use that resource:
10. PREVENTING SPAM BLOCKING OF SEDM EMAILS
Some Internet Service Providers have blocked delivery of our emails and do not even bother to notify the sender that the emails are blocked. This creates HUGE problems for people who are trying to receive order confirmation emails or who want answers to contact messages that they send us. If you ordered something from our store and did not receive the order confirmation email, chances are that this problems is the culprit. These vendors include the following::
-
Yahoo mail: http://www.yahoo.com
Generally, the best way to prevent invisible blocking of email we send you is to add the following email address to the contact list within the address book of your web mail interface. Note that the "@" symbol is replaced with "(AT)" so that web crawlers don't capture the address and make us into a target for uninvited spam:
sedmorders (AT) sedm.org
The following subsections allow you to find out if your vendor is blocking our emails and how to work around the problem.
10.1: Determining if our Emails Sent to You Are Being Blocked
We don't send out email spam to our members. Everything we send out is solicited by our Members. Even so, our website is sometimes subject to spam blocking of emails we send you. This may happen, for instance, when you place an order in our store and never receive the corresponding Order Confirmation Email following completion of your order. This problem is a result mainly of the fact that our email server is shared with other vendors who also use our email server to send out spam. When this happens, we are unfortunately affected as well.
If you would like to identify whether our emails are being blocked, click on the following links.
- SenderBase (OFFSITE LINK)- The "SenderBase reputation score" should say either "Good" or "Neutral" if emails are NOT being blocked. It will say "Poor" in red if they are being blocked.
- Sender Score Certified (OFFSITE LINK)- The row entitled "Blacklists" should say "None". If there is a nonzero number in the row, our emails are being blocked/filtered.
- SpamHaus (OFFSITE LINK)
- SpamCop (OFFSITE LINK)
If, upon visiting the above spam filter blacklists, you find that our emails are being blocked because they appear in a "blacklist", please submit feedback to our Contact Us Page so that it may promptly be corrected.
10.2: Stopping Spam Blocking with Yahoo Mail: Classic Mode
Yahoo (http://yahoo.com) blocks our emails. Yahoo mail has two modes: Classic and Standard. The procedure in this section describes how to remove spam blocking for Classic Mode only. See the next section for Standard Mode. You will need to add a filter to unblock them as follows:
- Log on to your Yahoo e-mail account and click to go to your "Options"
- In the "Management" section, click on "Filters"
- Click the "Add" button. That will take you to the "Add Message
Filter" page as shown below.
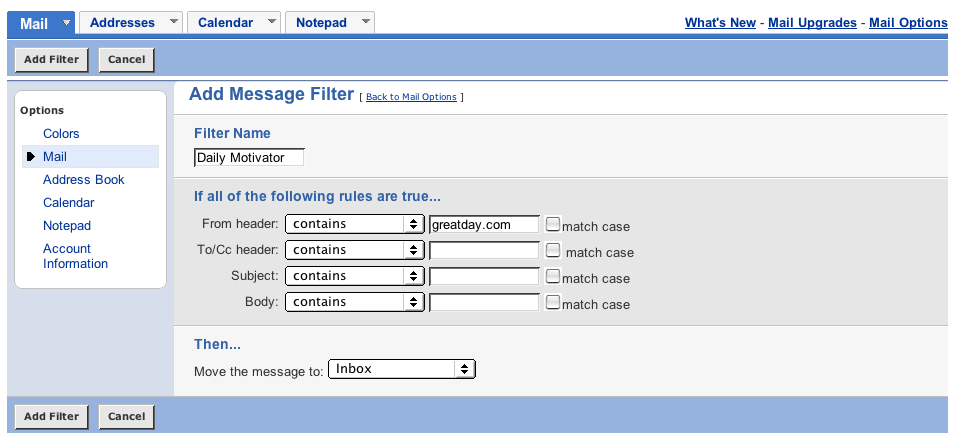
- On the "Add Filter" page, enter "SEDM" (without the quotes) in the box where it says "Filter Name"
- In the box next to where it says "From header: contains" enter "sedm.org" (without the quotes). DO NOT check the "match case" box. Leave it unchecked.
- In the next section, under the word "Then", where it says "Move message to:" select "Inbox"
- Then click the "Add Filter" button
- Then click "Mail" to take you back to your Mail page, and then log out.
NOTE: Even though you probably check your e-mail using an e-mail program, and not online, the filters that you set up online using the Yahoo website will apply to ALL the mail you receive at your "yahoo.com" address.
Please note that old messages that have already been deleted will not re-appear after you do this, but new messages sent the next day and thereafter will be directed to your Inbox instead of being treated as spam.
If you would like to complain to Yahoo about this problem, you may send a complaint email to: mail-abuse-bulk@cc.yahoo-inc.com. Unfortunately, we have no direct control over how they implement spam filtering.
10.3: Stopping Spam Blocking with Yahoo Mail: Standard Mode
Yahoo (http://yahoo.com) blocks our emails. Yahoo mail has two modes: Classic and Standard. The procedure in this section describes how to remove spam blocking for Standard Mode only. See the previous section for Classic Mode. If you started in the Classic Mode, you can enter the Standard Mode by selecting "All New Mail" in the upper right corner. You will need to add a filter to unblock them as follows:
- Log on to your Yahoo e-mail account and click to go to your "Options". A menu will pop up.
- In the popup menu, select "Mail Options". An options screen will show up.
- On the left, select "Filters".
- On the right hand side of the screen, click "Create or Edit Filters". The Filters screen pops up.
- Click the Add button.
- In the "From Header" row, select "Contains".
- To the right of the contains list box, enter "sedm.org".
- On the "Add Filter" page, enter "SEDM" (without the quotes) in the box where it says "Filter Name"
- In the box next to where it says "From header: contains" enter "sedm.org" (without the quotes). DO NOT check the "match case" box. Leave it unchecked.
- In the next section, under the word "Then", where it says "Move message to:" select "Inbox"
- Then click the "Add Filter" button
- Then click "Mail" to take you back to your Mail page, and then log out.
NOTE: Even though you probably check your e-mail using an e-mail program, and not online, the filters that you set up online using the Yahoo website will apply to ALL the mail you receive at your "yahoo.com" address.
Please note that old messages that have already been deleted will not re-appear after you do this, but new messages sent the next day and thereafter will be directed to your Inbox instead of being treated as spam.
If you would like to complain to Yahoo about this problem, you may send a complaint email to: mail-abuse-bulk@cc.yahoo-inc.com. Unfortunately, we have no direct control over how they implement spam filtering.
11. FAMILY LEGAL ASSISTANT DATABASE CASE MANAGEMENT SYSTEM:
This section describes how to resolve problems
encountered installing and using our Family Legal Assistant (FLA) software. Most of the questions we get relate to how to install the
program. Installation of the program is described in sections 2.2
through 2.2.9 of the free ![]() Family Legal Assistant
(FLA) User Manual, Form #09.019. If you are installing or using
this software, regardless of what version of the program you are using,
we recommend using the latest version of the Family Legal Assistant (FLA)
Manual, which you can always obtain using the link below:
Family Legal Assistant
(FLA) User Manual, Form #09.019. If you are installing or using
this software, regardless of what version of the program you are using,
we recommend using the latest version of the Family Legal Assistant (FLA)
Manual, which you can always obtain using the link below:
11.1 Setting Up the FLA Program
The following links provide tools to help you setup the Family Legal Assistant (FLA) program, and how to access the ZIP file that comes with it.
- Setting Up the
Family Legal Assistant (FLA) program (36 minutes, 56MB;Microsoft
Media Player required)- video demonstration of how to unzip
the program, create the program directories, copy the files
to the new directories, create the program shortcut, and register
the program
- Family Legal Assistant (FLA)
Quick Start Guide-Short printed quick start guide that helps
you setup the FLA software
11.2 Setting up the Program Shortcut
The ![]() Family Legal Assistant
(FLA) User Manual, Form #09.019, section 2.2.4, describes how to
set up the FLA Program Shortcut that you can click on to startup the program from your desktop
or Windows Start Bar. Some people have trouble creating this shortcut
using the instructions, causing the program to not run properly when
you start up the program. This section will show you how to create
this shortcut simply and easily in order to correct the problems you
are having:
Family Legal Assistant
(FLA) User Manual, Form #09.019, section 2.2.4, describes how to
set up the FLA Program Shortcut that you can click on to startup the program from your desktop
or Windows Start Bar. Some people have trouble creating this shortcut
using the instructions, causing the program to not run properly when
you start up the program. This section will show you how to create
this shortcut simply and easily in order to correct the problems you
are having:
-
Using pre-made shortcut on the Family Legal Assistant (FLA) Zip: The Family Legal Assistant (FLA) ZIP file comes with a shortcut that is ready to go. To use this pre-made shortcut:
1.1 Copy or download the FLA ZIP file to your local hard drive drive.
1.2 Open your Windows Explorer by right clicking on the START button and selecting "Explore".
1.3 Using the Windows Explorer, navigate to the ZIP file.
1.4 In the above directory, find the following file, where XXXX is the version of access you are using:
"FLAShortcutXXXX"
1.5 Click on the shortcut file and then drag it to your desktop or your start bar.
1.6 From either your desktop or your start bar, click on the shortcut you created above and the program will start properly.
-
Using the free shortcut available on this website: You can follow the procedures in step one above and instead use the following shortcut off our website. Simply right-click on the link, select "Save As", and then save it to your local hard drive. Use the following shortcuts.
Microsoft Access 2002: http://sedm.org/Support/11-FLA/FLAShortcut2002.lnk
Microsoft Access 2003: http://sedm.org/Support/11-FLA/FLAShortcut2003.lnk
Microsoft Access 2007: http://sedm.org/Support/11-FLA/FLAShortcut2007.lnk
Microsoft Access 2010: http://sedm.org/Support/11-FLA/FLAShortcut2010.lnk
Building the shortcut yourself: If you want to make your own shortcut, you can follow section 2.2.4 of the FLA User Manual to create the shortcut, and simply paste the text below into the "Target" window of the Shortcut Properties window shown in the manual: Select the following text with your mouse and right click on the selection and select "Copy" to put it into your clipboard. Then go to the Shortcut "Target window" and hit "Ctrl-V" to paste the text into the field.
Microsoft Access 2002:
"C:\Program Files\Microsoft Office\OFFICE10\MSACCESS.EXE" C:\Database\FLA\fla2k.mdb /wrkgrp C:\Database\FLA\Secured.mdw /User decoder
Microsoft Access 2003:
"C:\Program Files\Microsoft Office\OFFICE11\MSACCESS.EXE" C:\Database\FLA\fla2k.mdb /wrkgrp C:\Database\FLA\Secured.mdw /User decoder
Microsoft Access 2007:
"C:\Program Files\Microsoft Office\OFFICE12\MSACCESS.EXE" C:\Database\FLA\fla2k.mdb /wrkgrp C:\Database\FLA\Secured.mdw /User decoder
Microsoft Access 2010:
"C:\Program Files\Microsoft Office\OFFICE14\MSACCESS.EXE" C:\Database\FLA\fla2k.mdb /wrkgrp C:\Database\FLA\Secured.mdw /User decoder
11.3 FLA Video Demonstration
The following link provides a video demonstration of the main features of the Family Legal Assistant (FLA) Case Management System.
11.4 Managing Cases and Clients with FLA
The following link provides a demonstration of how to use the Family Legal Assistant (FLA) to manage cases and clients, and how to enter, delete, and copy data within client records.
12. ACTIVISM TRAINING:
This section is provided for Members and Activism group leaders alike. We show you:
- How to use the activism pages.
- How to use the SEDM Jurisdiction Database Online.
- How and where to conduct meetings and events.
12.1 Video Tutorial: Using the Activism Map
The following link shows both members and Activism Group Leaders how to use the Activism Map located on the opening page of the website. This map is the primary tool used to locate information and events within your specific geographic area.
12.2 Video Tutorial: Using the SEDM Jurisdictions Database Online
The following link shows how to use the SEDM Jurisdictions Database Online, Litigation Tool #09.004, to drastically speed up your litigation and legal research. Intended audience is any member who is litigating in court in defense of their constitutional rights.
12.3 Video Tutorial: Locating and contacting members in your area
The following link shows Members how to locate and contact other members in their area in order to form activism groups and law study groups in their area. Non-members or those without forum accounts will not be able to do all the things demonstrated in the video.
12.4 Video Tutorial: Using the Activism Pleading Library
The following link shows how to us the Activism Pleading Library. This library is provided for use only by Members who are involved in activism groups in their area.
13. ACTIVISM LEADER TRAINING:
This section is provided for Activism group leaders, including Activism Team Leaders, County Coordinators, and State Coordinators. We show you:
- How to update areas in the forums that you are responsible for.
- The vetting process for new coordinators.
- Documents to need to get you started after you have been vetted.
13.1 Video Tutorial: Activism Group Leader Orientation
The following link is intended for Activism Group Leaders who have just been vetted and selected as Team Leaders, County Coordinators, and State Coordinators.
13.2 Video Tutorial: Updating state or county area information
The following link is intended as an orientation and introduction for Activism Group Leaders who have just been vetted and selected as Team Leaders, County Coordinators, and State Coordinators. It shows how to keep the areas on their state or county page updated with information relevant to their geographic area of responsibility.
13.3 Video Tutorial: Vetting and approving new county coordinators and activism leaders within your region
The following link is intended as an orientation and introduction for Activism Group Leaders who have just been vetted and selected as Team Leaders, County Coordinators, and State Coordinators. It shows how to keep the areas on their state or county page updated with information relevant to their geographic area of responsibility.